
Create and Manage an AI Trainer
This article covers building a trainer from scratch, editing one, and removing one. For what a trainer is and when to use it, see Intro to AI Trainer.
Before you start
- Creating and editing trainers requires admin or manager access. If you don't have it, the Create AI Trainer button is greyed out with a tooltip explaining why.
- Have your resource ready. A trainer cannot be saved without at least one document attached, so upload your playbook, product doc, or call guide to Resources first if it isn't there already.
Create a trainer
Go to Practice > AI Trainer and click Create AI Trainer. The editor opens with three sections listed down the left: Trainer info, Persona, and Preview. You can move between them freely — nothing is saved until you click Save.
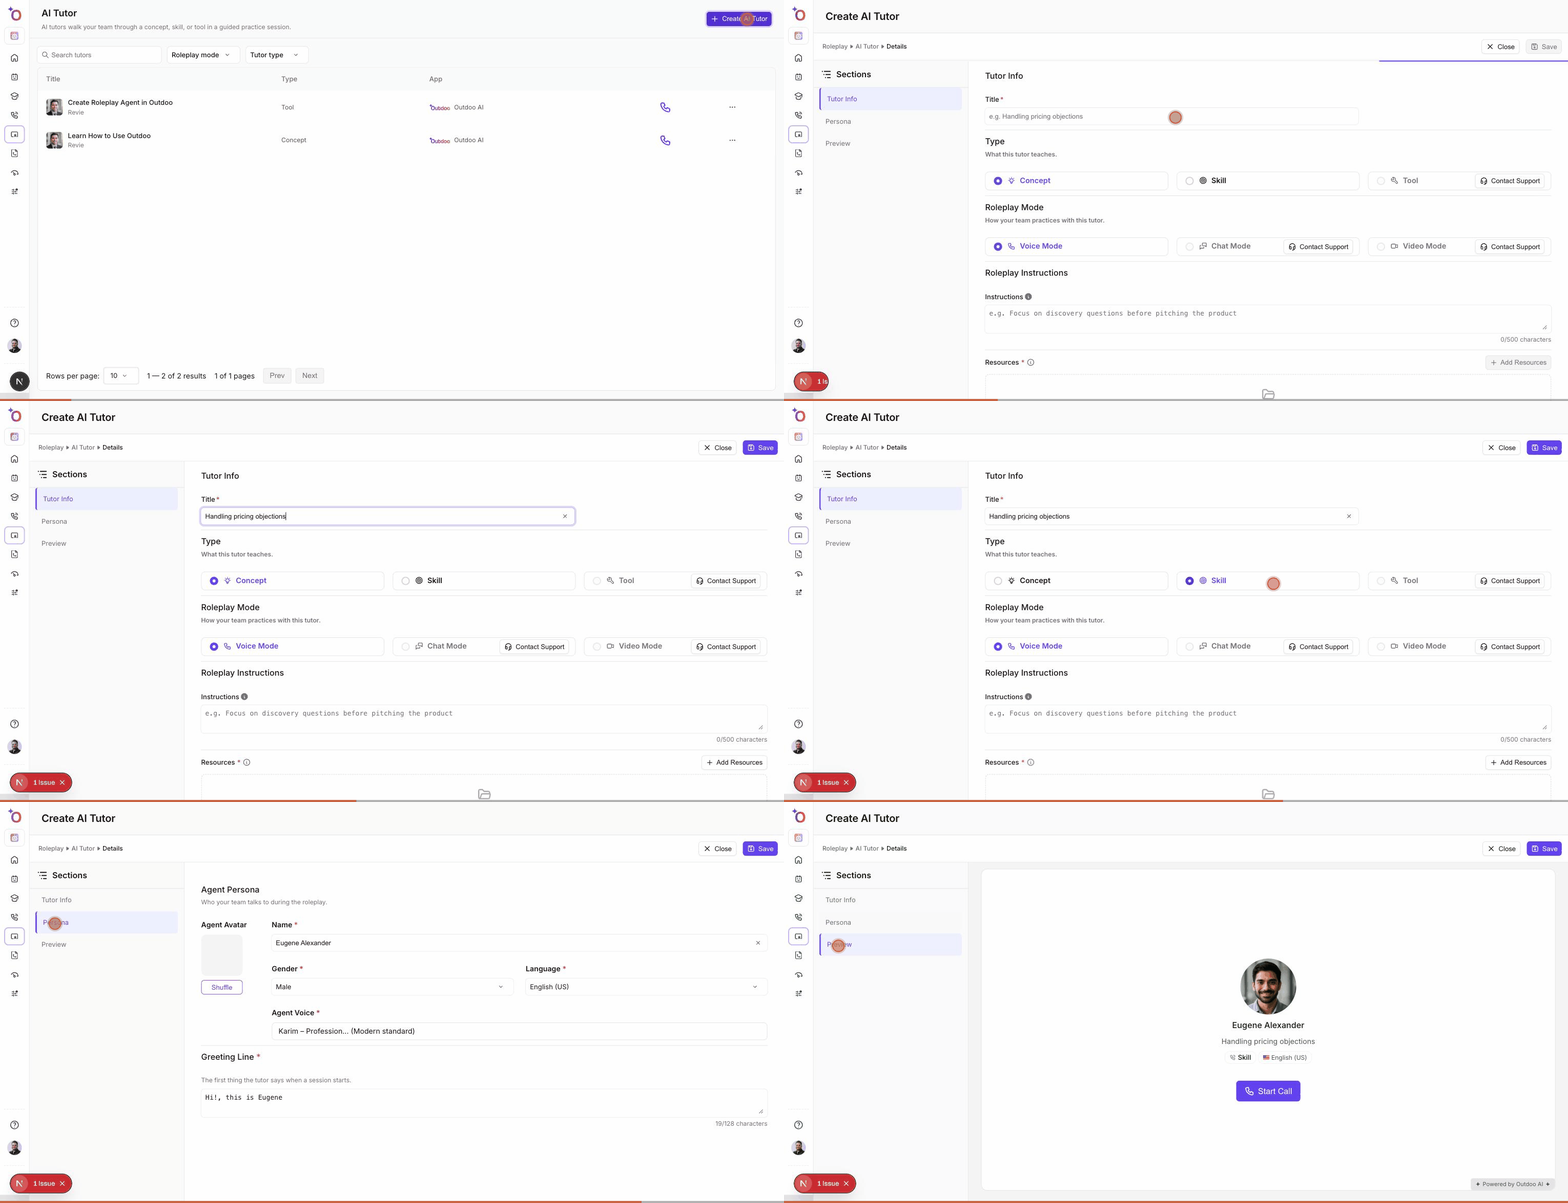
The full create flow, from the trainer list through to Preview.
1. Trainer info
Title. What the trainer is called in the list. Up to 128 characters. Make it specific about the subject rather than the format — "Handling pricing objections" tells your team more than "Sales trainer".
Type. What this trainer teaches. Pick Concept for understanding something, or Skill for doing something. Tool is available on request — click Contact Support on that option to book time with us and have it enabled.
Roleplay Mode. How your team practises with this trainer. Voice Mode is available by default. Chat Mode and Video Mode are available on request — click Contact Support on either option to have it enabled.
Roleplay Instructions. Optional, up to 500 characters. Whatever you write here is shown to the learner right before the session starts. Use it to frame the session: what to focus on, what to avoid, what "good" looks like.
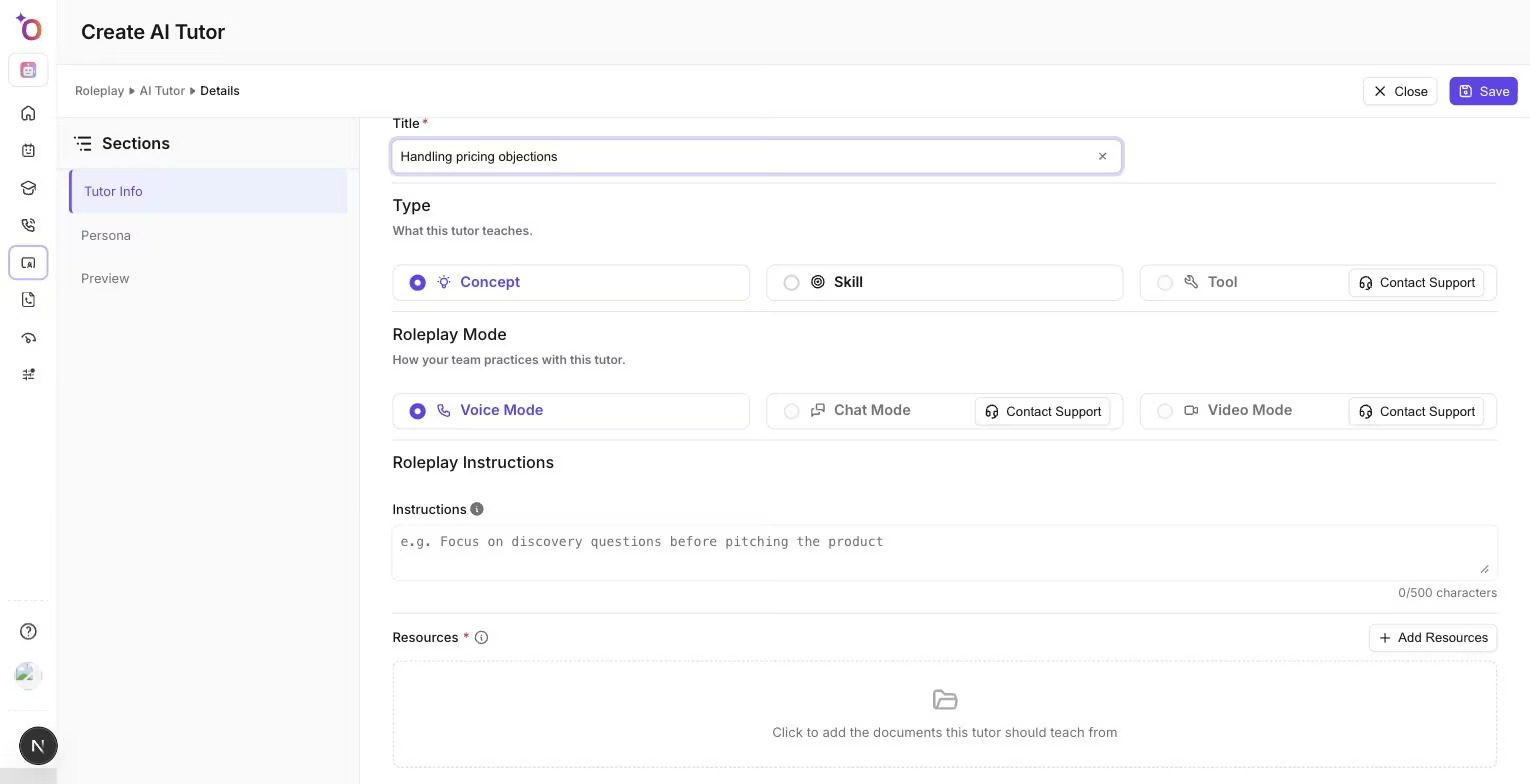
The Trainer info section. Options that need enabling show a Contact Support button.
Resources. Required. Click Add Resources and pick the documents this trainer should teach from. You can attach more than one, and you can remove any of them with the × on the row. The trainer teaches from these documents, so attach the source material itself rather than a summary of it.
Only document formats can be attached to a trainer — PDF, DOC, DOCX, PPT and PPTX. Audio, video, CSV and spreadsheet files stay in your Resources library but won't appear in the picker here, so convert anything you need into a document first.
2. Persona
This section is who the learner meets when the session starts.
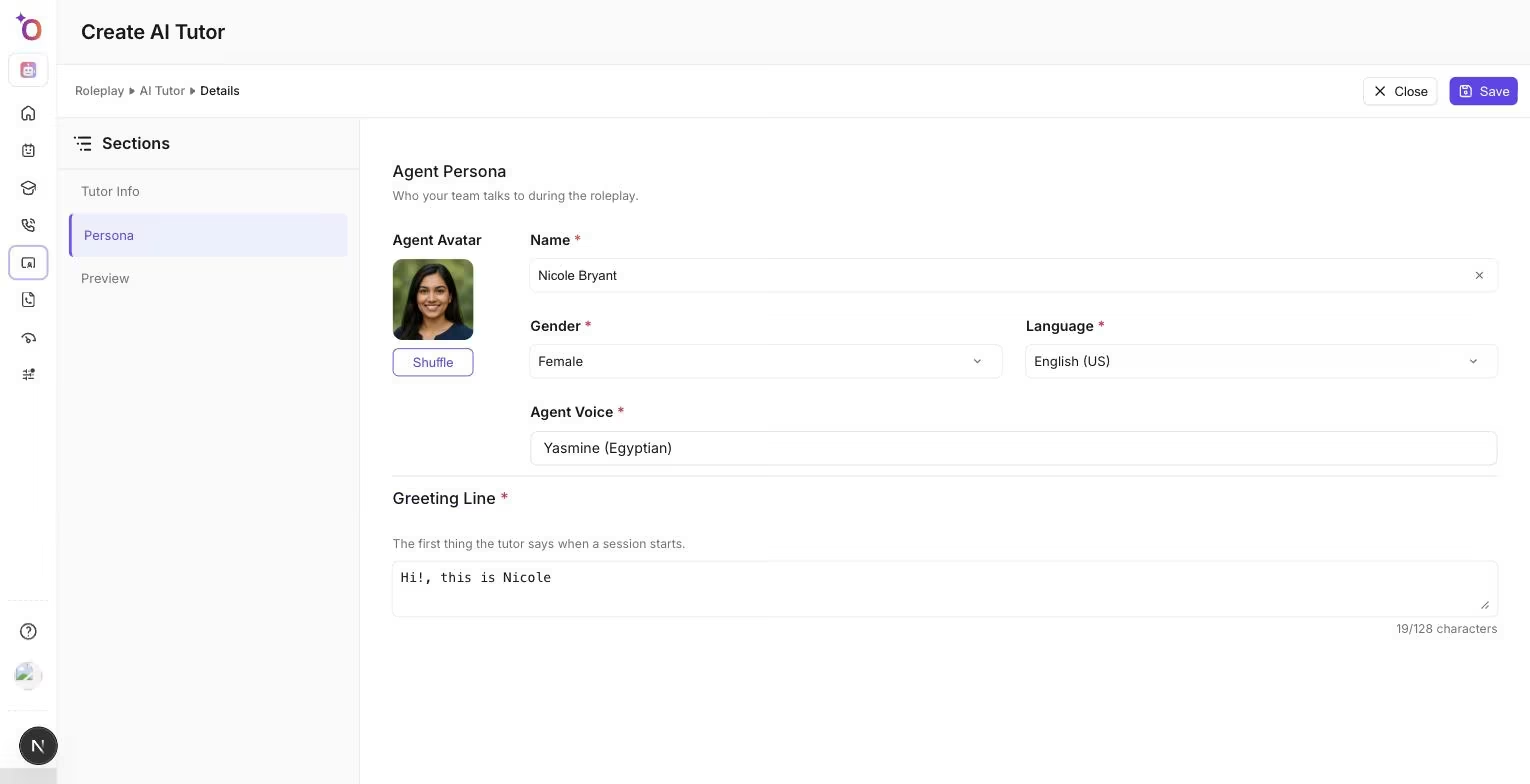
The Persona section, pre-filled when you open the editor.
Avatar. Outdoo picks one for you when you open the editor. Use the shuffle control for a different suggestion, or open the picker to choose from the full set.
Name. Required. The trainer's name — for example, "Alex Morgan".
Gender. Required. Changing it re-suggests a matching voice.
Language. Required. Defaults to English (US).
Agent Voice. Required for voice trainers. Open the voice picker and play the samples to hear each one before you commit. (Voice is not used by chat-only trainers.)
Greeting Line. Required, up to 128 characters. The first thing the trainer says when the session opens — for example, "Hi, this is Alex." Outdoo pre-fills one based on the persona name; edit it to set the tone you want.
3. Preview
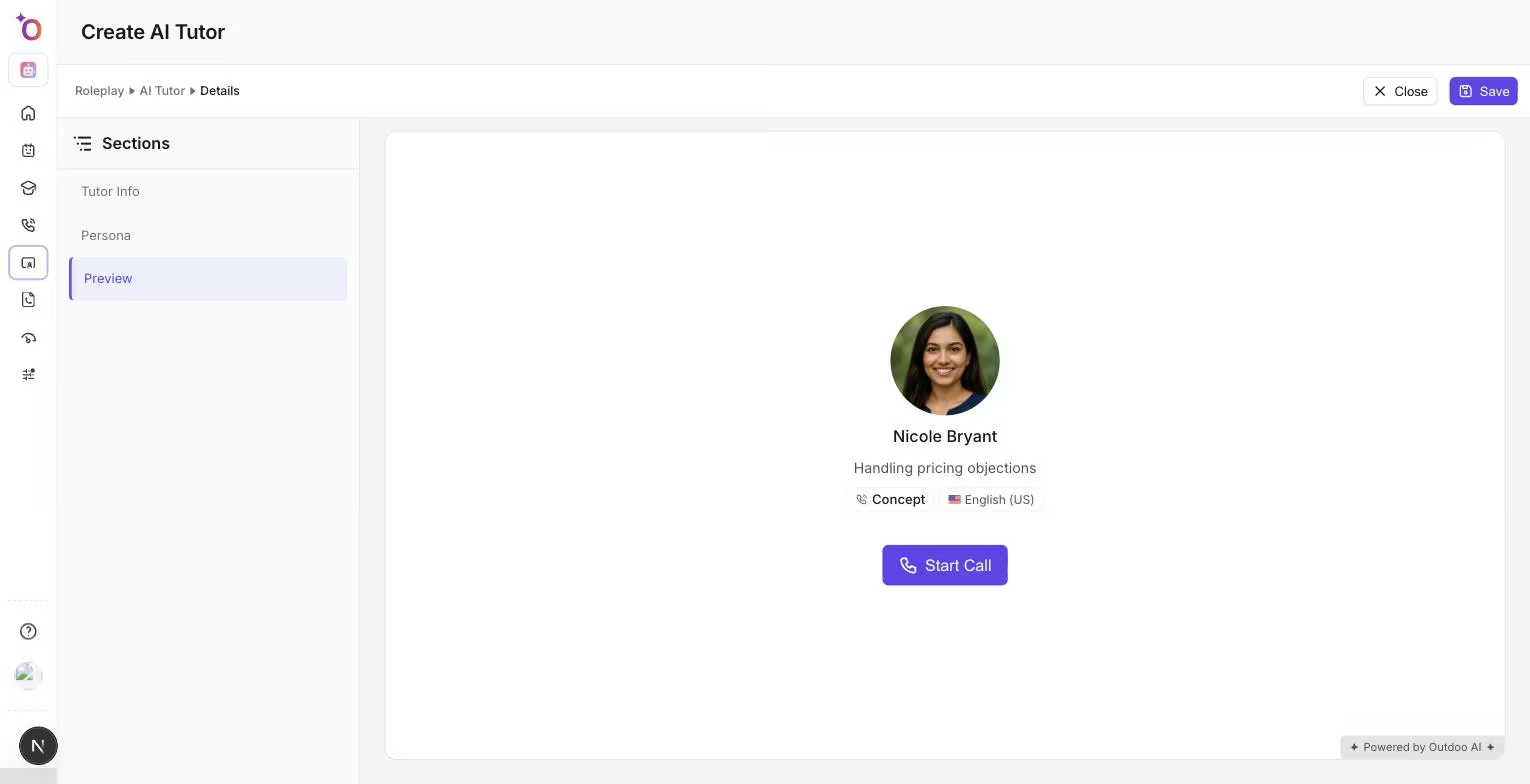
Preview shows the trainer exactly as your team will see it.
Preview shows the session screen your team will see when they open this trainer — the avatar, the persona name, the title, the type and the language, laid out exactly as it will appear to them. Use it as a last look at the setup before you save.
You can't start a session from Preview. The Start Call button appears but stays disabled, because there's nothing to run against until the trainer is saved. To hear the voice and check that the trainer really answers from your resource, save it first, then open it from the AI Trainer list and start a session there. If something needs changing, edit the trainer and save again.
Save
Click Save in the top-right corner. If anything required is missing, Outdoo jumps you to the first field that needs attention and marks it. Once saved, the trainer appears in the AI Trainer list and is available to your team.
If you try to close the editor with unsaved changes, Outdoo asks you to confirm before discarding them — choose Keep editing to go back, or Discard changes to leave without saving.
Default trainers
Your workspace comes with a set of trainers that Outdoo ships by default. They work like any other trainer in a session, but they belong to Outdoo rather than to your workspace, so nobody can change them — not even an admin.
You can spot them in two places:
- In the AI Trainer list they carry a Default badge next to the title, and the row has no ⋯ menu at all — so there's no Edit and no Delete.
- Opening one shows the header as AI Trainer with a Default · view only badge, the fields filled in but not editable, and no Save button.
There's no way to copy or edit a default trainer. If you want one that works the same way but teaches from your own material, build a new trainer from scratch.
Edit a trainer
Go to Practice > AI Trainer, find the trainer in the list, and open the ⋯ menu on its row, then click Edit. The editor opens with everything filled in. Change what you need and click Save.
Edits apply to future sessions. Sessions your team has already completed are not affected.
Delete a trainer
Open the ⋯ menu on the trainer's row and click Delete, then confirm. Deleting removes the trainer from the list so it can no longer be practised with. It does not delete the resources attached to it — those stay in Resources and can be used by other trainers and agents.
What happens after a session
A trainer session doesn't send your team anywhere else when it ends. The session screen stays open, runs through a short processing sequence while the transcript and insights are prepared, and then asks How was your AI trainer call experience? — a thumbs up or down with an optional comment. That's feedback on the trainer itself and has no effect on anyone's scores.
The session is saved to Practice History, where you can open it to play the recording back and read the transcript. Trainer sessions count as Practice Calls, together with roleplay calls. Trainer sessions aren't scored, so the Scorecard, Stats and Screen tabs you'd see on a roleplay session aren't shown, and there's no call score on the recording. The history page carries a Start AI Trainer button if the learner wants another run at the same trainer.
Finding a trainer in the list
Each row in the AI Trainer list shows the trainer's title with its persona name underneath, the Type, the App, and the roleplay mode. App only fills in for trainers tied to a specific application, so it stays empty unless the Tool type has been enabled for your workspace.
Use the search box to find a trainer by title, and the Trainer type and Roleplay mode filters to narrow the list. Clicking the mode icon on a row starts a session with that trainer straight from the list.
Hope this article was helpful. For any queries, please write to support@outdoo.ai