
Embed an AI Trainer Anywhere
Embed an AI Trainer into your website, LMS, LXP, sales enablement platform, or internal wiki so your team can practice sales conversations wherever they already work.
You can add an AI Trainer to any page as a self-contained practice panel. Team members can open the panel and start practising sales conversations with an AI-powered trainer without having to navigate to Outdoo separately.
Whether you want to make sales training part of your onboarding programme, provide on-demand practice alongside sales playbooks, or give your team a dedicated space to sharpen their selling skills, embedding an AI Sales Trainer makes practice accessible within their existing workflow.
The trainer runs inside a sandboxed <iframe> and can be added anywhere you can paste custom HTML, including your website, Sales Content Management (SCM) tool, LMS, LXP, or internal documentation platform.
If you're embedding into Salesforce Lightning specifically, use Embed an AI Trainer in Salesforce instead — it covers the specific Trusted URL and Session Settings configuration. This article covers all other platforms.
Before you start
Make sure you meet the following requirements before generating an embed code:
- Required permissions: Your permission profile must have Manage agents and Embed agents enabled to generate an embed code.
- Trainer must be published and Active: Draft or inactive AI Trainers cannot be embedded.
- Single-persona trainer: Multi-persona AI Trainers are not currently supported for embedding.
- No workflow or screen-capture steps: The trainer must not have a workflow or screen-capture step attached, as these require the Outdoo browser extension, which cannot run inside an iframe.
- Roleplay app enabled: Your workspace must have the Roleplay app enabled.
If an AI Trainer does not meet the first four conditions, the Embed agent option will not appear in its Actions menu.
Get the embed code
AI Trainers list with the three-dot Actions menu for a trainer.
Open the trainer's ••• menu in the Actions column to find the Embed agent option.
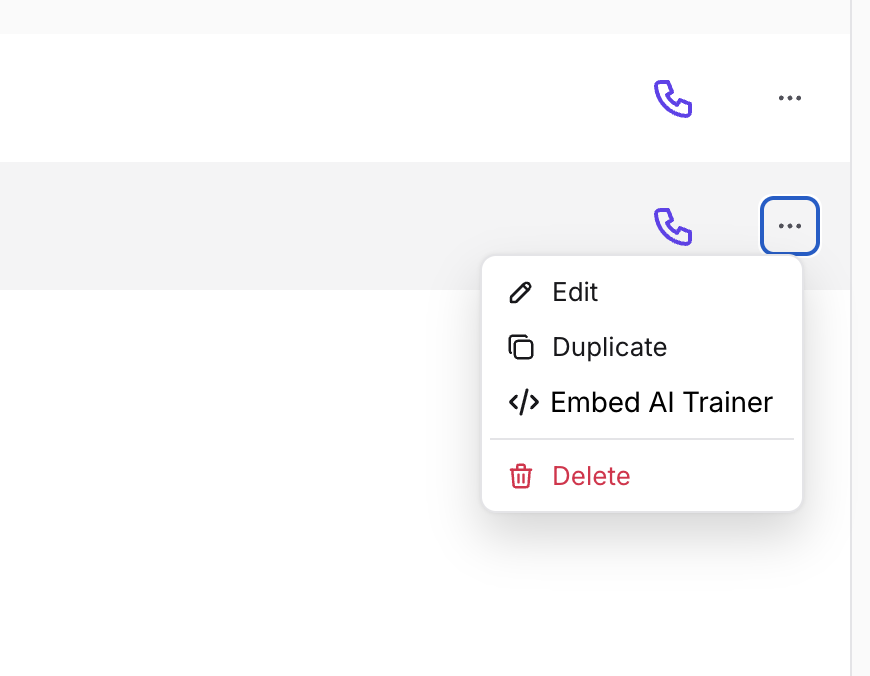
Follow these steps:
- Go to Practice > AI Trainer
- Find the AI Trainer you want to embed.
- Open its ••• menu in the Actions column.
- Select Embed agent.
- Optionally configure the Width and Height (defaults to 100% / 100%).
- Click Copy iframe HTML.
The copied snippet will look like this:
<iframe src="https://app.outdoo.ai/embed/roleplay/agent/<botId>"
  allow="camera *; microphone *; display-capture *; autoplay *; fullscreen *"
  width="100%"
  height="100%"
  style="min-width: 375px; min-height: 650px; border: 0">
</iframe>
Replace <botId> only if you are manually constructing the embed URL. Otherwise, use the generated snippet as it is.
Important: Keep the allow attribute exactly as generated. AI Trainers that support voice or video practice require camera and microphone permissions. Without these permissions, the browser may block the session. Chat-only trainers do not require camera or microphone access.
What the host platform needs to support
Before embedding your AI Trainer, check that the host platform supports the following:
1. Custom HTML or iframe support
The platform must allow you to add custom HTML or an iframe. Depending on the tool, this feature may be called Custom HTML, Web Content, Embed, or Iframe Widget.
2. Frame/CSP allowlisting
Some platforms restrict which external domains can load inside embedded frames through their Content Security Policy (CSP).
If your platform has a frame-src or frame-ancestors restriction, make sure your Outdoo domain is allowed.
3. Camera and microphone permissions
For voice and video-based practice, the host platform must allow camera and microphone permissions to be passed
Hope this article was helpful. For any queries, please write to support@outdoo.ai